IT resources
Connecting to CIBR servers
Note: connecting from outside of JYU network requires VPN!
We offer Cisco AnyConnect VPN Client for JYU staff. All JYU staff has access to staff-VPN, which can be used to connect to the CIBR servers. Address is vpn.jyu.fi and group is staff. If you do not have rights for Staff-VPN, things get a bit more complicated, but we have a dedicated lab-vpn for this. Please read instructions below.
First, inform CIBR support personnel that you would need the access to servers with lab-vpn. When you are added to the pass list, use Cisco AnyConnect VPN but with address labvpn.jyu.fi and group meg-lab-users. Give your 8-letter username and write your JYU password to the first password field. For the second password, you need authentication using the Duo app: https://www.jyu.fi/digipalvelut/en/guides/data-security/duo-mfa-en. Once you have Duo working and open, write to the second password field the word push to get a access request on your mobile Duo app. Now you should be in the JYU network and you can proceed connecting to CIBR servers. See the links below (in Finnish and English) to start using Duo authentication (the same as used for NextCloud).
Connecting to CIBR Servers using NoMachine virtual desktop
- Install the NoMachine client from nomachine.com, if it has not yet been installed on your computer
- Click the connection you want to re-establish. If there are no suitable connections, you need to make a new one as follows:
- Choose “New connection”, and protocol NX.
- To host field, write the server name (cibr1.psy.jyu.fi or cibr2.psy.jyu.fi, NOTE: these have changed from cibr-srvX on Summer 2020)
- For authentication, we are using JYU user name + password
- Fill in the remaining details, if any
- Double-click to log in to the server using your personal user name and password
- If you have connection problems, check first that the protocol is NX and the port is 4000. Confirm that you have the rights to access (i.e. user account for the server)
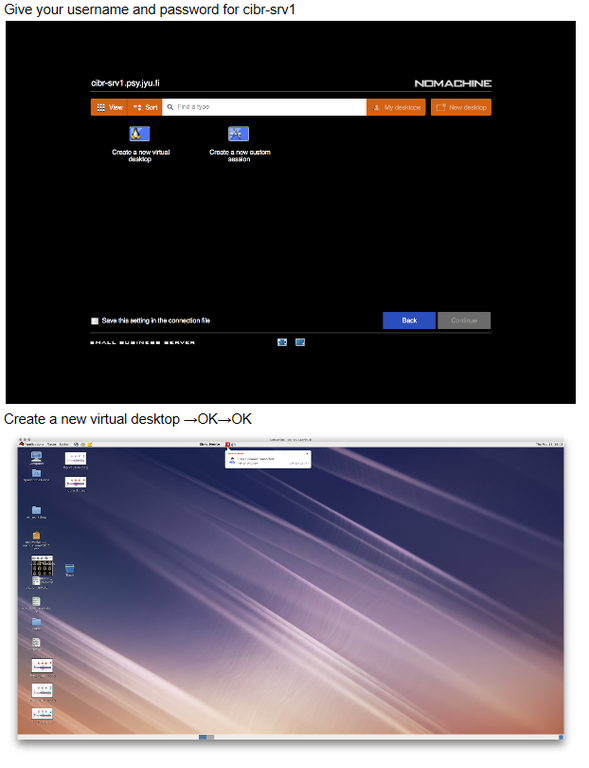
- Double-click on “Create new virtual desktop”. Conduct your work as if sitting next to the server computer!
- When you are finished, you have two options:
- if you are really entirely finished, log out by clicking your name in title bar and “Quit”. This will logout and close your session on the server, and it will free the NoMachine license for the other users.
- if you are going to continue later from this point, you can just close the NoMachine window without logging out from the server. The session will remain available, and you can later re-connect from the same or another computer.
Write cibr1.psy.jyu.fi to “Find a user or a desktop” → Enter → YES
Give your username and password for cibr1 (NOTE cibr-srvX are made obsolete on Summer 2020, use cibrX instead)
Connecting to CIBR server using Xming and Putty on Windows (example Matlab)
For this recipe to work, you need:
- Windows computer with access to CIBR server
- Putty installed
- Xming installed
In JYU computers Xming is available via the Software Center. If Putty is not already installed on your computer, you can freely download and use it on your computer without administrative rights.
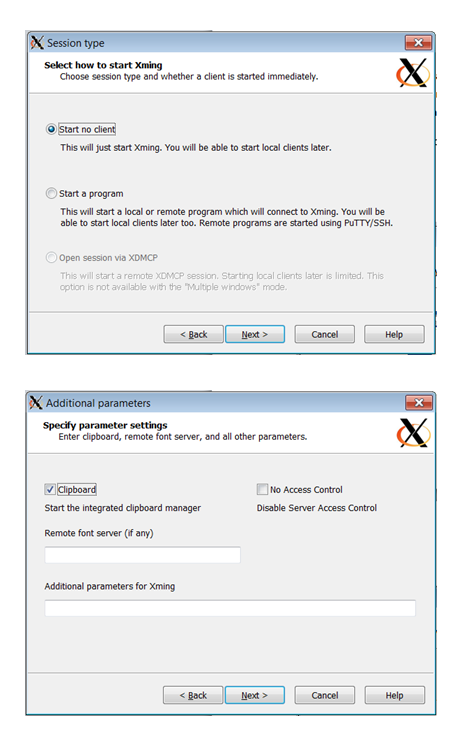
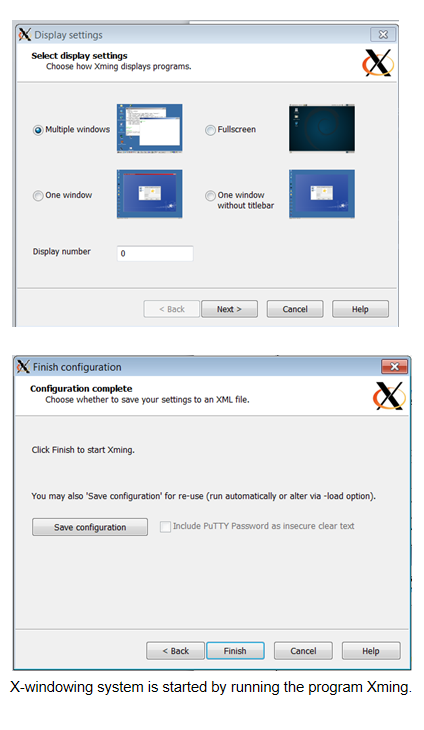
After Xming and Putty are downloaded, set the following settings on them:
Xlaunch
Putty
To ease your future connections, first create a new “Saved session” by writing any name you want to “Saved Sessions” box and the server address to “Host name”. The server address can be either “cibr1.psy.jyu.fi” or “cibr2.psy.jyu.fi” (NOTE cibr-srvX are made obsolete on Summer 2020, use cibrX instead). Port is 22 and connection type is SSH.
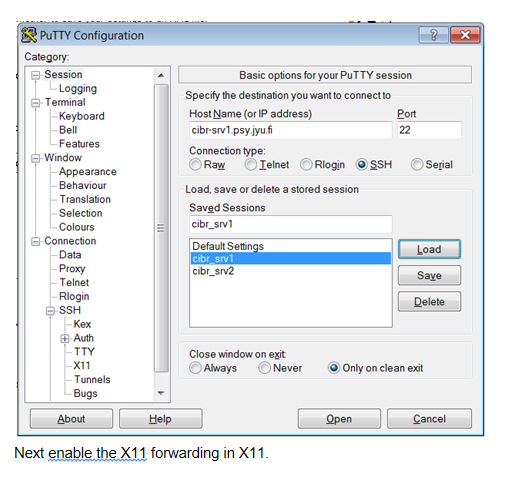
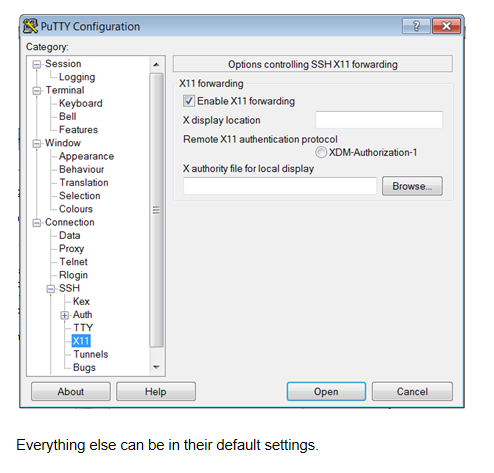 Go back to “Session” and press save on you “Saved sessions” to save your session which you can in future just run by double clicking from the “Saved sessions” or by first loading it and then pressing “Open”.
Opening Matlab with Putty
First run Xming. This will create a stylized X-icon in the lower right corner of the Windows taskbar which indicates that the X-windowing is now available.
Open SSH connection with Putty to CIBR-server by using the instructions above.
Next you will be asked for your JYU username and password.
Afterwards you will end up to a screen which looks like this:
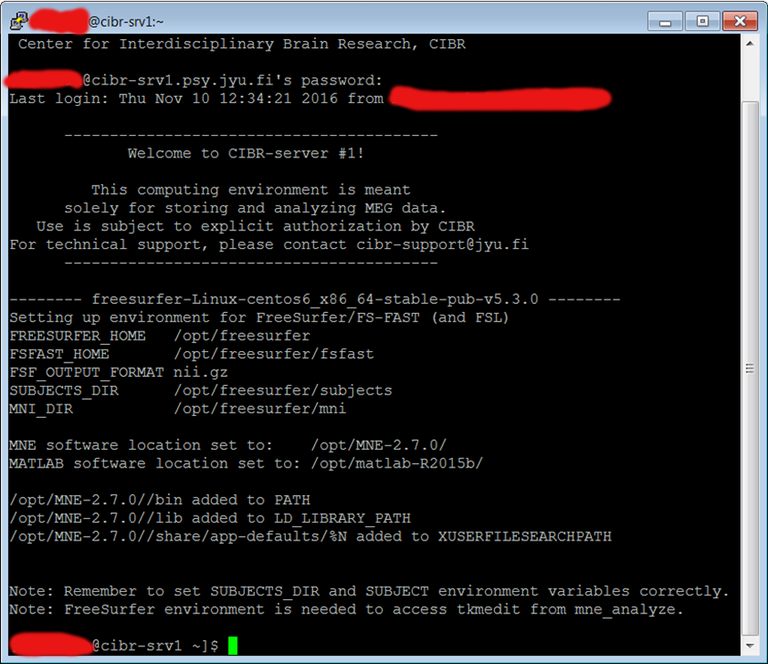
Now by typing “Matlab” and pressing enter you should get the program up and running with a graphical user interface.
Connecting with SSH (Linux/Mac terminal)
SSH is natively installed on Linux and MacOS computers. All you need to do to get connected to CIBR servers from JYU network or Staff-VPN is opening a command terminal and writing:
ssh -Y <username>@cibr1.psy.jyu.fi
where you naturally replace <username> with your 8-letter user name. Give your password when the system asks for it and you’re ready. The option -Y can be skipped if you don't need any graphics.
Connecting to "S:/" and/or "U:/" drive using NoMachine
Opening file format on the server
Kärki 2nd floor analysis class
Kärki 2nd floor computer (analysis) room, Aa2xx
This room is meant mainly for student work. The equipment available is:
- 7 Windows computers with internet access
- Used by all psychology students and occasionally staff members
- Use your personal JYU account to login
- Some of the computers might have certain special programs installed, like BESA
- NoMachine available
- 4 Linux computers with network
- Used for accessing the CIBR servers
- NoMachine available
- Shared username and password
- 1 Stimulus computer with no internet access
- A replicate of the MEG stimulus computer
- Presentation (with license dongle) installed
- Can be used to test your Presentation or Python paradigms for MEG
- Equipped with a self-made button box which electronically and logically works (almost) like the 4-button response pad in the MEG lab
MEG lab computers
MEG laboratory measurement room has five computers. One is for data acquisition (named Dacq), two for stimulus system (one Windows, one Linux based). One computer is a touch screen monitor/computer which works on Windows. This computer is normally only used for EEG preparation. But it can also be used for other subject preparations, for example HPI coil setups. However, this might not be extremely straightforward. The fifth computer is situated in the back room and can be used for data pre-analysis. This computer has direct access to the data acquisition computer, but only to a certain folder. Therefore, if one wants to use the computer for data analysis, the data has to be saved to a correct place.
Dacq
- Nowadays only common username and password are used. If you don't know them, maybe you don't need them.
- If you are measuring sensitive data to the computer, remember to transfer it to the CIBR server and then delete from the local computer after the transfer has been completed and secured.
- Is used to control the Helium recycling scheduler.
Stim-pc
- Common username and password.
- Windows-based.
- Normally used for Presentation-based stimulus.
- No internet access.
Linux-stim
- Common username and password.
- Linux-based.
- Normally used for Python- or Matlab-based stimulus.
- No internet access.
Use the switch below the Stim-PC screen to switch the projector display and/or trigger source between Stim-PC and Linux-stim.
Subject preparation/digitization computer (touch screen)
- Common username and password
- Can be connected to DACQ via SSH and run the prepare MEG acquisition program
Data backups
- All the MEG data should be saved only in the CIBR data servers.
- The CIBR servers are backed up every day by the IT services. Therefore users are not required to make any additional backups by themselves.
- Additionally, all the data is also backed up to a place which is far away from JYU campus. Therefore local catastrophes (like alien invasions) should not make the data disappear for good.
- Backups are incrementally available back to at least three months.
- All the MEG raw data are collected to a file, which is write protected. However, when the data is transferred to the server, or the user permissions (like reading rights) are managed in the server, also the write protection of the original raw data in the server might change. Users are recommended to make sure, that all the original raw data in the server are in their own folders, which is always write protected.
- For handling different versions of analysis scripts, it is recommended to use some version control system. For example Git or GitLab (supported by JYU).
If there is an unfortunate event, and you lose some of your precious data, contact the JYU IT services. Most likely you will have to fill a web form for this. You will need the following information
- The date from where the data should be retrieved (to get the correct version)
- Path of the data file
- Name of the data file (should be exact to make finding the file/folder easier)
- It is not possible to go all the way back to stone ages to retrieve your lost files. But at least 3 months should be possible.