Preparing the subject
Participant preparation
Before participant arrives.
An important part of an MEG measurement is to prepare for subject arrival. Before subject’s arrival, you should have made sure that:
- the lab space and shielded room are tidy and things there are in order
- there are clean measurement clothes just in case
- your experiment is ready to go, i.e. channels, stimuli, triggers etc. set up and tested
- all the equipment are there (e.g. for attaching electrodes)
- you have a kind and professional mindset
Once the subject arrives
- interview the subject and tell what you need and want about the experiment
- take signature for consent and do possible other paper work
- set aside personal metals and phone of the subject, as well as yours
- test in MEG if the subject is magnetic (movements, breathing)
- prepare HPI, EEG, EOG, ECG, etc. (see below)
- give task instructions at least twice during preparation and finally in the shielded room
- give MEG instructions (don’t move and blink as little as possible, relax... these are for the participant, you can move and blink if you like)
HPI coil preparations
1) Preparative steps
- Turn Polhemus on
- Check that the beach chair is not near any metallic material or electromagnetic sources
- Check that there are no metallic objects in the subject or yourself
- Attach the Polhemus transmitter on the back of the chair, wire going downwards
- Make sure that you have prepared the data acquisition software
2) Position HPI coils to the scalp or cap
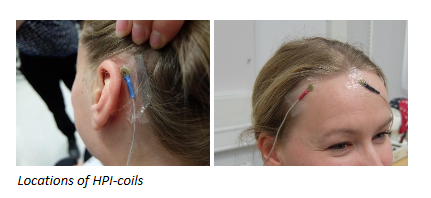
- Attach the 5 coils firmly to the scalp (not hair!) with your favourite method, lab provides transparent tapes for this purpose
- Recommended coil positions for accurate head position estimation are as follows:
- as high as possible so that MEG detects the coil signals
- 2 behind ears, 2 on the temples, one on the forehead
- take care to not cross the eyes, ears, or back of the head with the cables
- if you use EEG, fix the coils evenly around the top of the cap instead.

3) Document nasion and preauricular points
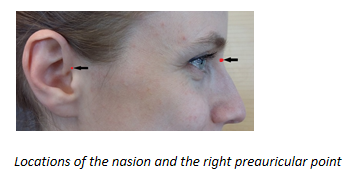
- It will prove helpful in the later stages of the project, if you mark the landmark points with a marker pen and take a few photos from different angles
- Photos illustrate the recommended anatomical landmark points. Remember to ask for a permission for these photos from the participant.
- It is most important that the points are known and consistent and that they can be found on the MRI images

4) Put the glasses, headband or a separate receiver element on the subject
- Check that the points you need to digitise are not covered by the glasses and that they are easily accessible with the digitisation pen.
- Make sure the glasses/headband don’t move on the subject during digitization.
- Instead of glasses, you can use a separate receiver and fix it e.g. to the EEG cap.
- Glasses (or headband or receiver) must stay stable throughout the digitization.
- From this step on, minimise subject head movements (avoid interaction for a while).
5) Digitize anatomical coordinates
- Select HPI digitization in the acquisition software.
- Click Coordinate frame alignment.
- Ask the subject to stay still during digitisation.
- Make sure the pen cable does not cross the transmitter in the back of the chair.
- Digitize the nasion and the left and right preauricular points with the Polhemus pen by clicking the button on the pen.
In the data acquisition software, check the difference found between the left and right pre-auricular points. If this is over 4 mm, redo measurement by clicking Coordinate frame alignment again and repeating the procedure.
Optionally, you can have an assistant on the MEG control computer to help in the digitization. Instead of selecting Coordinate frame alignment, the assistant can mark the points by clicking the corresponding buttons on preparation software.
6) Digitize HPI coils, EEG electrodes, and extra points
- Click HPI coils
- Digitize the center of all five attached HPI-coils
- If the suggestion in HPI coils is REDO -> check if coils are loose and try again
- Click EEG electrodes
- Digitize the centre of each electrode in specified order, starting with the Ref.
- If you make a mistake, you can go back and forth using the arrow buttons.
- Click Pen in the bottom right of screen
- Gently stroke the pen over the head while keeping the button down, or click several dozens of extra points around the head.
- Good candidates for extra points are bony skull regions and a few on the nose
- When enough extra points have been marked, click the pen away twice
-
On the data acquisition computer, select → File → Save preparation
7) Check the HPI coil digitization
Select Check and proceed with HPI coil digitisation again. Errors should be only a couple of millimetres. Otherwise, Redo. You can also perform this check on an earlier stage.
8) Save the preparation
Saving the HPI digitisation helps if the data acquisition program or even the whole computer has to be restarted.
9) Do one-time or continuous HPI measurement when subject is ready
- Remove glasses or headband, but be careful to not move the HPI coils, electrodes etc.!
- Once the subject is seated or lying in the MEG device, attach the HPI coil socket in the red plug on the left hand side of the gantry
- Once you start data acquisition, the software asks to do an HPI measurement. Check that the digitisation and MEG coil fit correspond well to each other (reported coil-to-coil distances around 2 mm). Take a note of the head coordinate origin.
- If you are doing continuous head position monitoring, click the cHPI button.
- If you want to monitor head movement, but do not want to use cHPI all the time, you can turn cHPI on for a couple of seconds every minute or two. MaxFilter then has the option -movecomp inter for intermittent movement correction.
Head Position Indicator (HPI) measurement in nutshell
- Preparative steps
- Position HPI coils to the scalp or cap
- Document nasion and preauricular points
- Put the glasses or the receiver element on the subject
- Digitize anatomical coordinates (nasion, LPA, RPA)
- Digitize HPI coils, EEG electrodes, and extra points
- Check the HPI coil position digitization
- Save the preparation and note the saving time
- Do one-time or continuous HPI measurement when subject is ready
NOTE: The HPI measurement is one of the most important steps in data acquisition. For the sake of quality, please do it carefully and in a consistent manner for each and every subject. In case of problems at this stage, contact CIBR support for help.
MEG study checklist (pdf)